
![]()
![]()
Comit-TX™
VERILOG TESTBENCH EXTRACTOR
USER MANUAL
Version: 1.0© Comit Systems, Inc.,
All Rights Reserved
CONTENTS
1.0 INTRODUCTION
2.0 APPLICATIONS
3.0 USAGE
4.0 INPUT & OUTPUT
5.0 INTEGRATION WITH VERILOG-XL
6.0 TESTBENCH EXTRACTION PROCEDURE
7.0 ILLUSTRATION
APPENDICES
A full_adder.v: Full-Adder Verilog Code
B full_adder_tb.v: Full-Adder testbench.
C H1.v & H1.vlg : The testbench extracted by Comit-TX for the half-adder.
D H1.rpt: Report generated when the half-adder is simulated.
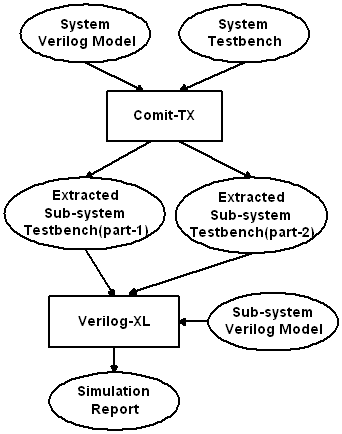
1.0 INTRODUCTION Comit-TX is a testbench extraction tool written in Verilog PLI. Given the testbench of a system or a module this tool can extract and write out a self-testing test-bench in Verilog for any sub-system or sub-module thereof. For self- testing the tool adds additional commands in the generated testbench to detect and report any deviations in the beha- vior exhibited by the sub-module or sub-system when it is simulated stand-alone with the extracted testbench from that it exhibited when simulated as part of the full system. This tool can handle any depth of hierarchy. The tool makes the following assumptions:1. The test coverage of the system level testbench is satisfactory. The test coverage of the extracted test- bench is solely dependent on that of the system level testbench.
2. The behavior exhibited by the sub-system (as part of the system) when simulated with system level testbench is the desired behavior of the sub-system.
Comit-TX Flow
2.0 APPLICATIONS The Comit-TX can be used to extract testbenches for any sub- module or sub-system of a system provided a system level testbench exists. Here is an interesting question which must be answered before going further! When the sub-system for which the testbench is to be extracted was part of the full-system, it was verified and validated anyway! What is that we are achieving extra by extracting and re-testing that sub-module? The answer is there are many possible scenarios where it may be very helpful and in fact nece- ssary to test the sub-module stand-alone! Here are a few cases.1. Even if the sub-system was validated as part of the system, a method is required to demonstrate to the customer that the sub-system really does what it is intended to do, as a stand-alone entity.
2. The sub-system or sub-module as a stand-alone entity may be subject to some modifications and/or optimi- zations that could not be done when it was part of the full system. Now, we need to make sure that the beha- vior of the sub-system didn't change because of the optimizations and/or modifications.
3. Say, in a big system some of the modules could have been represented at higher levels of abstraction and the system specifications, including timing, were frozen. When these modules are replaced by RTL or structural level design to include all the details, we need to make sure that the module behaves exactly as it's higher level counter part does.
In all the above cases the testbench extractor can help, by automatically extracting the testbench from the system- level testbench and setting tests to detect any deviations in the behavior and promptly reporting them.

3.0 USAGE The system task used to extract the testbench is $comit_tx. This new system task is obtained by integrating Comit-TX PLI with the Verilog-XL. For extracting the testbench the system task needs the hierarchical-name of the instance for which to extract the testbench and the non-hierarchical name of the sub-system. Also if the sub-system under consideration has bidirectional ports, the designer is expected to specify them along with their control signals, and the logic values of the control signals at which the bidirectional bus acts as input.
3.1 ARGUMENTS
$comit_tx(instance_name, sub_module_name, [inout_count]
[io_1], [ctl_1], [cval_1], ...,
[io_n], [ctl_n], [cval_n]);instance_name : Hierarchical instance name of the sub- system for which the testbench is to be extracted.
sub_module_name: Non-hierarchical name of the sub-system for which the testbench is to be extracted.
io_cnt: The count of the bidirectional (inout) signals.
io_n : Non-hierarchical name of the bidirectional signal.
ctl_n : Non-hierarchical name of the control signal of io_n.
cval_n: Value of the ctl_n signal at which io_n would act as input.
3.2 ARGUMENT SPECIFICATION EXAMPLES Typically the $comit_tx would be called from within an initial block. 3.2.1 Without any bidirectional signals the call to $comit_tx would appear as:
initial
begin
$comit_tx("test.micro.ALU.mult", "multiplier");
...
end3.2.2 With a bidirectional signal the call to $comit_tx would appear as:
initial
begin
$comit_tx("test.micro.CTL", "controller",
1, "io1", "ctl1", 1);
....
end
4.0 INPUTS & OUTPUTS In the following discussion, Comit-TX is used to mean Verilog-XL with Comit-TX PLI integrated.
4.1 INPUTS The following are the inputs to the Comit-TX that shall be required for extracting the testbench.1. The Verilog model of the System.
2. The system level testbench with $comit_tx called with appro- priate arguments.
4.2 OUTPUTS The outputs from the extractor are:
1. instance.v: Contains the top level test module with all the declarations and instantiation of the module. This file also contains a statement to include instance.vlg
2. instance.vlg: This file contains the actual testbench and and the self-testing commands.When the module under test is simulated with the extracted testbench a report (instance.rpt) is generated. This report contains difference, if any, in the behavior of the module when simulated independently and when simulated as part of the system.
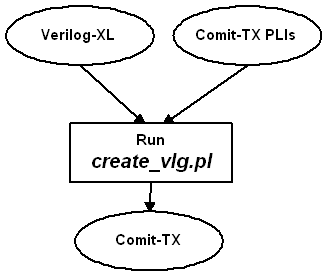
5.0 INTEGRATION WITH VERILOG-XL The Comit-TX is generated by integrating TX PLI with Verilog-XL, by running the script create_vlg.pl from the directory where comit_tx.o file exists.
Comit-TX Integration
6.0 TESTBENCH EXTRACTION PROCEDURE For extracting the testbench follow the steps below.
6.1 Create a new Verilog-XL executable(Comit-TX) by integra- ting TX PLI with Verilog-XL (See sec# 5.0). With this integration the new system task $comit_tx will be available to the designer.
6.2 In the system testbench call the system task $comit_tx from a procedural block. (See sec# 3.2) eg.
initial
begin
$comit_tx("test.I1.M1", "mod_name);
end6.3 Simulate the design with Comit-TX. This step generates the testbench for the sub-module. See sec# 4.2
7.0 ILLUSTRATION All the steps involved in the testbench extraction process are illustrated below with a FULL-ADDER design as an example. The FULL-ADDER has been chosen as an example because it is a very simple design and does not need any time or explaining to understand it. At the same time it offers a design hierarchy, the FULL-ADDER is made up of two HALF-ADDERS, sufficient enough to show how the tool works!7.1 ASSUMPTIONS
7.1.1 comit_tx.c: The file containing Comit-TX PLI source code.
7.1.2 $TX_HOME: The directory where comit_tx.c resides. TX_HOME = /users/neni/prj/src/
7.1.3 $CDS_INSTALL: The Cadence installation directory. CDS_INSTALL = /tools/cds97a/
7.2 INTEGRATION
7.2.1 Run the create_vlg.pl script as specified to integrate Comit-TX PLIs with Verilog-XL.
7.2.2 Add $comit_tx system task to system level testbench of FULL- ADDER. The objective is to extract the testbench of the half-adder.
See full_adder.v
See full_adder_tb.v7.2.3 Run the simulation (command: comit-tx full_adder.v full_adder_tb.v)
7.2.4 The result of the above step is generation of testbench for the half_adder. The testbench is generated into two files viz. H1.v and H1.vlg. The H1.v contains the top level module and all the declarations and instantiations. The H1.vlg contains the commands that apply different values on signals and commands to check if sub-system behaviour is as expected.
See H1.v
See H1.vlg7.3 To run simulation on the HALF-ADDER
7.3.1 Move the HDL code of the HALF-ADDER into a new file half_adder.v See half_adder.v
7.3.2 Run the simulation with the normal verilog-xl (command: verilog half_adder.v H1.v)
7.3.3 The above simulation generates a report (H1.rpt) on the deviations, if any, in the behavior of the HALF-ADDER, from the expected behavior. See H1.rpt
APPENDICES
A full_adder.v
B full_adder_tb.v
C H1.v & H1.vlg
D H1.rpt/**********************************************************
* Design : Full Adder *
* Purpose: To be used as an example in the Testbench *
* eXtractor [TX] document. *
* Author : Venkat Talapaneni *
* Date : October 29, 1997. *
**********************************************************/`timescale 100ps/1ps
module full_adder(carry_out, sum, carry_in, in2, in1);
input in1; // First Addend
input in2; // Second Addend
input carry_in; // Input Carry
output [1:0] sum; // Sum
output carry_out; // Output Carryhalf_adder H1 (carry, sum[0], in2, in1);
half_adder H2 (carry_out, sum[1], carry, carry_in);
endmodulemodule half_adder(carry, sum, in1, in2);
input in1;
input in2;
output carry;
output sum;xor X1 (sum, in1, in2);
and A1 (carry, in1, in2);
endmodule
/**********************************************************
* Design : Testbench for Full Adder (see add.v) *
* Purpose: To be used as an example for illustrating the *
* Testbench eXtractor [TX] operation. *
* Author : Venkat Talapaneni *
* Date : October 29, 1997 *
**********************************************************/
module test;reg in2, in1, carry_in;
wire [1:0] sum;
wire carry_out;full_adder I1 (carry_out, sum, carry_in, in2, in1);
always
begin
#10 in1 = ~in1;
endalways
begin
#20 in2 = ~in2;
endalways
begin
#40 carry_in = ~carry_in;
endinitial
begin
$display("\t\t TIME CIN IN2 IN1 COUT SUM\n");
$monitor($time,," %b %b %b %b %b",
carry_in, in2, in1, carry_out, sum);
// $comit_tx (Hierarchical_name_of_Instance, Non_hierarchical_name_of_module);
$comit_tx("test.I1.H1", "half_adder");
#0 in1=0; in2=0; carry_in=0;
#100 $finish;
endendmodule
/**************************************************************
* *
* Testbench of half_adder *
* Generated by Testbench Extractor Version: 1.0 31/Oct/1997. *
* *
**************************************************************/
module H1_test;reg in1;
reg in2;
wire carry;
reg exp_carry;
event txTest_carry;
wire sum;
reg exp_sum;
event txTest_sum;integer report; // Report file
half_adder H1_tx(
.in1(in1),
.in2(in2),
.carry(carry),
.sum(sum));initial
begin
report = $fopen("H1.rpt");
txApplyTests;
end
`include "H1.vlg"end
endtaskendmodule
/**************************************************************
* *
* Testbench of half_adder *
* Generated by Testbench Extractor Version: 1.0 31/Oct/1997. *
* *
**************************************************************/always @(txTest_carry)
begin
#1;
if (carry !== exp_carry)
$fdisplay(report, "%t OUTPUT: carry exp: %b act: %b\n",
$time, exp_carry, carry);
endalways @(txTest_sum)
begin
#1;
if (sum !== exp_sum)
$fdisplay(report, "%t OUTPUT: sum exp: %b act: %b\n",
$time, exp_sum, sum);
endtask txApplyTests;
begin
#0 // 0
in1=1'b0;
in2=1'b0;
exp_carry=1'b0; ->txTest_carry;
exp_sum=1'b0; ->txTest_sum;#1000 // 1000
in2=1'b1;
exp_sum=1'b1; ->txTest_sum;#1000 // 2000
in1=1'b1;
in2=1'b0;#1000 // 3000
in2=1'b1;
exp_carry=1'b1; ->txTest_carry;
exp_sum=1'b0; ->txTest_sum;#1000 // 4000
in1=1'b0;
in2=1'b0;
exp_carry=1'b0; ->txTest_carry;#1000 // 5000
in2=1'b1;
exp_sum=1'b1; ->txTest_sum;#1000 // 6000
in1=1'b1;
in2=1'b0;#1000 // 7000
in2=1'b1;
exp_carry=1'b1; ->txTest_carry;
exp_sum=1'b0; ->txTest_sum;#1000 // 8000
in1=1'b0;
in2=1'b0;
exp_carry=1'b0; ->txTest_carry;
+------------------------------------------------------+
| THIS FILE IS NULL BECAUSE THE ACTUAL BEHAVIOR OF THE |
| HALF-ADDER WAS IDENTICAL TO WHAT WAS EXPECTED! |
+------------------------------------------------------+However, the format of the report is:
TIME signal_name actual_val expected_value
![]()
![]()